So you decided to use ruby for something nobody uses it for, making a 2d program! Like many gems, ruby 2d can be a headache, however unlike most gems this also makes you rethink your life choices and your life in general because why would you use ruby for a 2d application. Well maybe your school is making you learn ruby and you want to mess around in 2d because you feel powerful now that you understand if statements. No matter the reason, if you're still reading this then you’re in the right place!!! probably…
Installation!
Assuming you already have ruby installed and somewhere to write your code (if you don’t, why are you here?), it’s a very simple process! Slap this is your terminal:
gem install ruby2d
hit enter, wait for the gibberish to finish and DONE! You can also add this in your gem file but nobody does that. lastly make sure you add:
require ‘ruby2d’
at the top of your file so you can use it!
Want to read this story later? Save it in Journal.
Basics and Creating Basic Shapes
before we get started on the cool coding stuff, keep in mind this picture

(picture from: https://www.ruby2d.com/learn/2d-basics/ Check out their page for everything so they don’t sue me, pretty much everything in this article is from https://www.ruby2d.com/)
This is how the coordinates are in ruby 2d and many 2d computer graphics, which is NOT how you learned x and y coordinates in school when doing algebra.
So you want to make squares huh? no? well I’m gonna show you anyway! just assign a variable like ‘happy_square’ to ‘Square.new’ like this:
happy_square = Square.new
Now you have a square! but it’s hiding so you need to call it to come out by typing ‘show’
PROGRESS! you have a window AND a square. Look at you, they said you’d never be anything in life but look where you are now! You can also do that with other shapes like a triangle by doing ‘Triangle.new’
So now that you’re feeling confident, it’s time to make you clueless, because that’s how learning to code works. If you wondered why your square is in the top left, remember our picture from before with the coordinates. By default the x and y values are set to (0,0). So let’s change that because the shapes want to social distance like the rest of us.
let’s grab our square from before and add onto it:
happy_square = Square.new(x: 50, y: 50, size: 100)
As you can see with this syntax you can now change the position of the square and the size. You will probably spend a lot of time trying to figure out where the coordinates you want, actually are on the window, so clear your calendar.
To check if your square covers a certain coordinate you can use .contains?
happy_square.contains? 75, 75
If you’re following along, this should return true. Now lets add a color! simply type ‘color: ‘blue’ ’
Square.new(x: 10, y: 20, size: 25, color: ‘blue’)
Inputs and Moving Shapes

If you’re wondering what you just saw and are confused, don’t worry, nobody knows what that means…except me of course!
Just like it says, define your initial speed as the default. Now use their very own special keywords to move your square. Before we get into specifics, you should understand that moving the square is simply changing its x and y coordinates. Knowing this you can copy paste the above code (funny that you would try that, its a picture :P write it out, stop being lazy).
Taking this piece by piece:
‘ on :key_down do |event|
end’
Means that when you press a key on your keyboard something will happen if that key is assigned something. This is where your super power (if statements) comes in handy.
‘ if event.key == ‘j’
@x_speed = -2
@y_speed = 0 ’
This means that if the key you pressed was ‘j’ the x coordinate is changed by -2, MEANING that you successfully moved the square just like you dreamt of doing your whole life. Then repeat with elsif statements and just change out the key you want to press and how you want it to move. What? you don’t see it move? just drop this in there and you’re good:
‘ update do
@square.x += @x_speed
@square.y += @y_speed
end ’
What about the mouse? I hear you ask. Well first of all get some mouse traps because I’m not coming to deal with that, that’s a you problem. Now that I inserted bad humor I will teach you how to use mouse inputs instead. You can use ‘ get :mouse_x ’ and ‘ get :mouse_y ’ to read the mouse. Then you can use:
‘ on :mouse do |event|
# A mouse event occurred
#do something
end ’
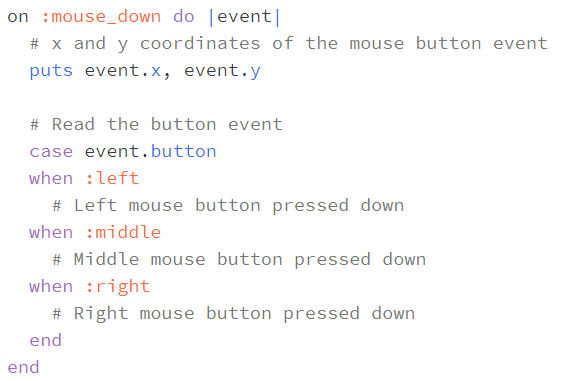
You can also choose what to do if the different buttons are pressed using case like so:
if you tried to copy paste that, haha got you again :P
Shapes and layering
You can check https://www.ruby2d.com/learn/shapes/ for a list of their shapes and how to manipulate them but there is one thing that’s important that you may not understand if I don’t bless you with the knowledge.
Z
Yes, z! The creators of ruby2d lied to you, there is a 3rd dimension in this and we represent this with z. No you cannot have 3d shapes, this refers to layering. This means that if you have two shapes that have overlapping parts, the one with the higher z value with be on top of the other. This is added the exact same way as the x and y coordinates from before with ‘ z: 2 ’
If you want to change any of those value after creation, you can simply use this syntax: ‘ happy_square.color = ‘red’ ’. Few things to note about this, you can change color and coordinates with it even if those are not defined on creation since defaults are used in place of the values you don’t change.
Text
You know what’s better than shapes? No not text, it’s donuts! But since you brought up text let’s print that on our screen too! It’s practically the same as the shape syntax only with the word Text instead:
happy_donut = Text.new(‘Donut’)
Now that you made your happy donut that puts ‘Donut’ on your screen you can use all the same things as before such as x y z values, size, and color BUT WAIT! Text also has font! Use these exactly like you did with the shapes.
Close
You wanna close the window?(resisting pun) Just type ‘close’
Window
Close your window and let’s make it better!
You can name the window like a pet! or give it a useful name that describes the program. You can do this by typing:
‘set title: ‘Jeffrey’ ’
You can also change the color at the same time or separately
‘set title: ‘ Jeffrey’, background: ‘navy’ ’
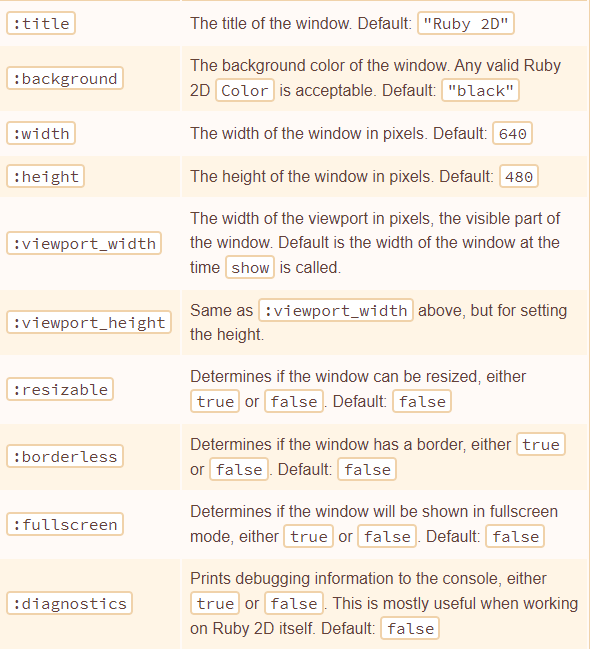
Or use any of these in the same way:
Add and Remove
We can now move into more specific things like adding and removing squares. Let’s say when you click the square (which you can detect with .contains?)you want it to get off your screen or to add another one there. After creating the shape it will automatically put it on your screen when run which essentially is doing:
‘ happy_square.add ’
you can type this to add that square on the screen if it isn’t there but you can also remove it with:
‘ happy_square.remove ’
or if you want to clear them all type
‘ clear ’
Extra
Another thing you can do is use if statements (and others) that execute something from ruby 2d for example if you click a certain square it closes the window by detecting mouse input on that square and if its true it runs ‘close’ or if a certain value is equal to something else it creates a new square.
My experience
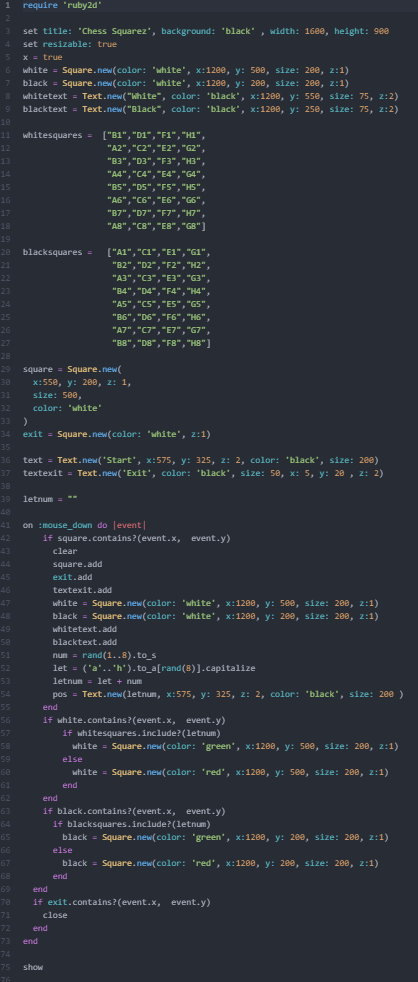
After just two weeks of learning some ruby basics I went on a journey to learn everything in this blog to make a useful little app that helps me memorize what color each square is on a chess board by showing me a coordinate (ex. B2) and then I click black or white and it tells me if I'm correct or not. Keep in mind I did this with just some loops and a handful of if statements, so if I can do it then, anyone can. Also my code was a 75 line mess with no methods or classes and things that I could have automated but didn’t because I didn’t know what I was doing. BUT it works! Here is my very unorganized first ruby2d app so you can feel more confident…hopefully
More from Journal
There are many Black creators doing incredible work in Tech. This collection of resources shines a light on some of us: